Thursday, July 28, 2011

How To Make a Duct Tape Wallet (With Pictures)

A lot of people have asked me how to make duct tape wallets, and I usually reply with "Google it.", This is for 2 reasons: 1. This is how I originally learned how. 2. It's not a 5 minute project. Quite a bit goes into it. I was actually pretty reluctant to do this tutorial, because I sell these wallets for money, and I didn't wanna lose any business...but when I realized that any idiot could Google it (Or, hell, I've even seen them being sold at Spencer's and Hot Topic!), I decided to write out a tutorial on how to make the wallets I make. I go into quite a bit of detail in this, and I've never done a tutorial before. If something is unclear, please let me know. 


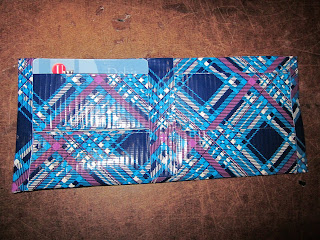
This is my wallet. This is what I will be showing you how to make. 
-Place for your money.
-3 credit card holders on the left.
-1 credit card holder on the right.
-ID holder.
-"Secret" pocket for your business cards and other stuff. 

*If there is ever any excess duct tape, you should cut it off with scissors unless otherwise specified* In some cases, you can just kind of tuck it into the place where your money goes, but I think cutting it off looks more professional.

What you'll need:
-Duct Tape (Obviously). I'll be using a Target exclusive Plaid, but you can of course use any color or pattern.
-Packing tape
-Scissors
-X-acto knife
-Measuring tape (or ruler)
-Your old wallet

How to make it:

1.  Make a sheet of duct tape fabric 8.5" wide x 7.5" high. If you're not familiar with making duct tape fabric, it's really easy: simply cut (or if you're me: rip) a length of duct tape, then turn it around so the adhesive side is up. Rip off a second length, place the adhesive sides together, but do it about 1/4" down. When you flip your piece over, there will be about 1/4" of exposed adhesive, that's where you should connect the next strip of duct tape. So on and so forth until you have this:

If you are using a patterned tape, try your best to match up the lines in the pattern. Sometimes you will have to initially rip off extra length, or it may not match up ideally, but do your best. Also, you only have to do this on one side, as the other side will fold up to hold your money and no one will ever see it.
2. Fold your sheet so it is now 8.5" x 3.75". What I do then is rip off about 4" of duct tape, then rip that in half, using one on each side. It saves tape, and doesn't intrude to much on the pattern of your wallet.

Tape the edges together.
3. (First, fold your actual wallet in half, then unfold it, you will see a crease in the center. This will be a guide so if your credit card holders are too big, you will know, you'll also know how far to either side to put them.) Now make a sheet of duct tape that is 4" wide x 3.5" high (this is for your 1st credit card). This is where your old wallets comes in. Take out one of your cards and use it as a reference on the new sheet. Tuck it in to see where you need to fold it to make a proper amount of your card exposed. 

Tip: When you make this new 'sheet', fold over the edges of your exposed tape instead of cutting it off. This will make it smoother and straighter. Then make sure you have the opposite side of where you folded it over the side that's facing outward for a nice, clean look.
4. Place your credit card and holder onto the left side of the wallet. Be sure the credit card holder isn't intruding on the crease, if so, move it over, or snip a little off. No harm will come of trimming it so long as the fabric for the holder is wider than the credit card. Now remove the card and hold the card holder in place as you use another half-strip of duct tape t tape it in place on the top. Fold the edge over the side where you hold the money.


5. Now put your credit card back and use another half-strip to tape down the right side. Make sure the tape is precisely adjacent to the card. By holding your card here while you tape down both sides, this will insure that your cards don't fall out.

Tip: You can just fold over the top part of the excess tape, but I would use your razor to cut off the excess tape on the bottom. Like I said, no one will be looking in the money holder part, but if you leave extra on the outside of your wallet, people are more apt to notice those flaws
6. Leaving the credit card there, use another half-strip on the left side.
Tip: While taping the left side, I would gently push your card to the right, then when you align the tape, it will be as snug as possible.

7. Now repeat steps 3 (after the parentheses) through 6 two more times. Be sure to line up all your credit cards, so every time you lay down a strip of tape on the left or right it is all even. Also be sure to keep your cards and holders straight, and to not get tape on the credit card above when you are taping the horizontal strip. You can probably add 1 or 2 more if you'd like (especially if your wallet ended up a little big somehow), but I personally don't need more than three.

Also note, as you fold your duct tape over on the far left side, don't worry about making them line up or look nice, we'll take care of that later.

8. Now take a regular strip of duct tape (NOT ripped in half) and place it over the bottom of your last credit card holder. This is just to smooth things out. 


9. Now it's looking a little rugged, yes? Using your razor, cut vertical lines to match up with the vertical strips of duct tape on the right and left hand sides of your cards.

Do this on both sides.
10. Now to do some more aesthetic stuff.After you've added your credit card holders, when you close your wallet and look at it from the outside, you might see a handful of uneven strips of duct tape from when you added your left hand side strips of duct tape that hold your credit cards in.


Pobody's Nerfect
11. We're going to remedy this by taking a strip of duct tape, and going just slightly past all the mess, cover it up. Then as you fold it over, you'll find it's going to stick to your cards. Just use a razor blade to cut it so it ends close to where your cards start.

Problem solved. It looks nice!
12. So yay! We're halfway done! The left side of your wallet should look like this now:


13. Now we're going to work on the right side. We're going to start by making two separate sheets of duct tape fabric. One is going to be just like the other ones you made for the credit card holders (4" x 3.5") the other one is going to be bigger, 4" wide x 7" high.


14. In the same way that you just did your credit card holders, do the same thing, but attach the credit card holder to the top of the 4" x 7" strip of fabric.

Tip: When you're attaching the right and left side, be sure the tape doesn't go very far past the bottom of the holder (about 1/2" is good). You're going to fold the bottom part up, so you don't want to see those random pieces of tape looking icky right next to your ID.
15. The same way you smoothed out the surface after your last credit card holder, do the same thing here. Instead of worrying about cutting the sides to look nice, you can just fold it over the sides.


16. Now, lay this sheet on the right side of your wallet, match the top of this with the top of the wallet. Fold up the bottom of the sheet so it will fit. You might find that it will be just a tad too long, if that's the case, just fold down the excess of the bottom of the sheet to see where you wanna cut it off.

Leave about 1/4" so you can get your ID in and out with ease. Cut at the crease, and make it as straight as possible.
17. Now it's time to make the hole for the ID. Place your actual ID right on the crease that you made at the bottom. Make sure your ID is lined up with the credit card you attached to this sheet of fabric. 

See how the sides are lined up? This will not only make your wallet nice and symmetrical, but will make things easier a couple steps from now.
18. Using a pen, trace your ID. Now, taking a razorblade, cut straight lines about an 1/8" or so inside those lines. You can round the corners if you'd like, but I usually make simple rectangles. Also note, that if your rectangle is not perfect, that's fine, you will be able to fix this later when you attach this to the wallet. If anything, just make sure the lines you cut are smooth.


19. Now keeping this fabric flat, put down 2 strips of packing tape, overlapping slightly. Then turn the piece around and do the same thing on the other side, making sure the tape over laps in the same place, also to keep as flat as possible to avoid air bubbles. I've had some pretty annoying air bubbles in the past, if this happens just stab them with a needle or your razor and flatten as best you can.


20. Now we're going to attach this to the wallet itself. Just like when you attached the first credit card holder, do the same thing here. Just do the one horizontal strip, though. This is different, so we won't be doing the vertical strips the same way.

Also, just like when you attached the first credit card holder, make sure it's not intruding on the crease of your wallet.
20. When you attached this, there is going to be some excess tape on the right and left hand sides. Use your razor to get ride of both of those.

Not only are these aesthetically displeasing, they also prevent us from our next step.

21. Now you can flip this piece away from the wallet. Folding over the bottom to create your ID holder, use a half-strip of duct tape to attach the bottom to where it should be attached, slightly below your last credit card. Fold it in, underneath the 4" x 7" piece of fabric. You will not be attaching this side to the actual wallet, as this is your 'secret' pocket for business cards and other such things. Also, if your rectangle is not symmetrical, you can use this piece of tape to make it so.


22. Now flip it back s it looks normal. Using another half strip of tape, attach the ID holder piece of fabric to the actual wallet on the right hand side. Remember, when you fold it over, it doesn't have to look perfect on the outside of the wallet, as we can fix that. If your rectangle for the ID wasn't symmetrical, you can use this piece of tape to make it so.


23. Using another half strip, attach the bottom. This is another place you can fix the rectangle for your ID holder if it isn't straight. If you're like me and rip your duct tape, your tape might not be kind of rugged. Use your razor to make it nice and straight for when you fold it over.

24. Using a razor, get rid of the ugly excess tape on the left hand side.


25. As a finishing touch, if the outside of your wallet looks ugly from attaching the ID holder, use another strip of tape to smooth it out.

I am convinced there's no way to get this to look nice the first time around.

Be sure to use your razor to cut it for the inside so it fits right next to your credit card, and tuck inside.


Huzzah! Now you have a duct tape wallet you can put all your stuff in. I hope this made sense, and good luck, have fun impressing all your friends, and one-upping their duct tape wallets (let's face it, we all know theirs probably suck).

Unsent Letters (Part 1/?)

Dear Don McLean,

While I was too young to remember meeting you, I'm very happy that I can say that I did. I wonder if you remember meeting me, but I doubt it. While you have a better chance of remembering such a thing, I don't know why you would. I know I was too young to understand who you were, why you were important, or that years later I would actually listen to your music and be moved by it, but that makes things like this so much more amazing.

Thanks for everything.

-Pam


I apologize in advance, as LiveJournal (my normal "feelings" journal) has not been working for about 3 - 4 days now, and they have no idea when it will be back up. I will still do my best to incorporate creativity into my feelings (and of course vise versa!), but I nonetheless apologize if I grow boring or emotional. To make up for it, I'll have a duct tape wallet tutorial in the next few days. Possibly a duct tape purse tutorial as well, but that probably won't be for a little while.

Tuesday, July 26, 2011

Inspiration Part 2 (Spiders and Princesses)

It's coming up on 3 AM, and I've done nothing artistic all day. I had a lot of things to do today, because some people have asked me to make them things (have PAID me to make them things) and I am neglecting them. It's not that I don't want to. It's not that I don't like these people, or that I don't like art. I am tired of making things right now. The same way people have weekends with work, people should have weekends with art. I hope they understand.

Here is some inspiration, and maybe a couple good reasons why arachnophobia is uneccesary.


The story behind this one is pretty neat. The man on the right was at Disney when Snow White came up to him and said "I made a wish today, a very special wish. Will you help me make it come true?" He replied with "I'll do my best", when to his surprise she put one of his hands on her hip, and grabbed the other one and began to waltz with him. 


Using this gorgeous Scorpio pin-up to bridge the gap between beautiful women and arachnids.

This is a colored pencil drawing of a P. Metallica, AKA the Gooty Sapphire Ornamental Tree Spider. This one definitely inspires me to maybe eventually draw/paint/color my own tarantula.
Juvenile Avicularia Versicolors are stunning. Its beautiful things like this that make me wonder how and why anybody could be afraid of spiders.


While this is not a princess nor a spider, I don't know who couldn't appreciate a chinchilla-sitting dog. Enjoy.

Thursday, July 21, 2011

Jewelry Guide II (How to Make Impressive Jewelry Without Actually Being Impressive)

When it comes to jewelry, I still have more ideas than I do skill. Toight I did a few necklaces to kill some time, and use up some pendants I had lying around. I found a really simple way to make a fairly impressive necklace without having very much skill.

I swear to God I'm wearing clothes!
This definitely looks more intimidating than it actually is.

You'll need:

- 3 Segments of chain (Mine are 14", 17.5" and 22")
- 3 Jump rings
- 3 Pendants (and jump rings)
- Lobster Clasp

The 3 chains can go on one jump ring, starting with the shortest:


I added the 2nd jump ring so it won't twist as much when you clasp it around your neck.

Now do the same thing on the other side, plus a lobster clasp.This time I put the longest one on first.


I put the charms on while I was wearing the necklace. I guess if you're a more logical/patient person, you could measure the chain and find the exact middle, but I'm not that patient...or logical.

This is really nice if you have a few charms laying around that wouldn't look great right next to each other, or if you've just been looking to make something with your extra chain that isn't just your typical necklace. Also, like I said, it looks more impressive, with very minimal extra work :)

Have fun!

Monday, July 11, 2011

Why There is No Reason You Can't Write a Novel This August

This August (Yes, as in the August that's a few weeks away) is Camp NaNoWriMo, a sister event to the legendary NaNoWriMo that takes place every November. Even if you've already been convinced to write a novel, you may be worried that you can't pull off a 50,000 word novel in 31 days, but I'm here to tell you that you can.

On your next day off, get out of your house. Get away form your computer, turn off your cell phone, and go some place no one can find you and do this. You will have an entire outline written in less than a day.

Step 1: Write down your 'stupid' idea.

Maybe you've just woken up form a dream. Maybe someone offhandedly said something odd to you. Maybe you can't sleep. Maybe you read a story but they just did it all wrong, and you think you can write it better. Whatever the case may be, you have an idea. It's a vague, poorly thought-out idea that isn't going anywhere. Maybe it's just "I just wanna write about zombies", but you don't know what else.

You know that old composition notebook you have lying around somewhere? The one you swore you would use to learn a new language, and when that didn't work out, you swore you'd use it to write poetry, and now it's just a notebook with 50 pages in it, because you ripped the other 50 out, but just didn't have the heart to throw away because you "might need it someday"? Well, today is that day. Find it. Open it. Write in it. Write the one sentence you heard that inspired you. Write the word "Zombies". Write down that crazy dream you had.

As soon as it's something tangible you can look at, I promise you will have ideas pouring forth. Your main characters will start with odd things "What if my main character has mutton chops. Like really, really absurd mutton chops." "What if a chinchilla is involved somehow?" "I've always liked dragons...there should definitely be dragons".

Soon, things will start developing. It will still be abstract. It's okay. This is brainstorming. I promise you're doing it right. You just have to write one thing down.

2. Write down character details.

So you have some basic ideas. You want your main character to be a bad ass zombie killer with some serious chops, a leather jacket, a pet man-eating chinchilla and a hot girlfriend who polishes shotguns for a living. That's great. That's...awesome, actually. But they need a little depth.

For me, this is where "write what you know" comes into play.

Use yourself. Use your friends. Maybe you have this one really cool friend who can strike matches on his cheek and be completely unfazed. Or a weird cousin who is kind of an alcoholic, and you have seen how he deals with situations he can't control. And maybe you've had a really strange childhood, and while you dealt with a lot of anger issues as a teenager, you came out of it a better, stronger person. Use this. Use all of this. Everything. From the odd quirks, to the distinctive things people do when they talk that make them...them. Take these things from real life, and your characters will also be real. If you don't have an actual person to base your characters off of, then how will they be real?

Also note, that the person you're basing them off of doesn't necessarily need to match in gender and age. You can write about a 20-year-old girl, but use a 28-year-old semi-effeminate male that you know. If it will work for you, then it will work.

I also like using this to help develop characters. Note, though, that not all characters have to be extremely well-rounded. By making some characters simple, flat and shallow, it will give you some dimension to the dynamic of your characters and how they interact with each other.

3. Write your outline.

I don't know what works for you, but you'll figure it out. Some people have index cards (me!), some people write out lists, some people make charts.

What I like to do is write a basic outline from start to finish (e.g. "Man wakes up one day to find that his chinchilla has a taste for human flesh. The zombie apocalypse has begun and now he must find a way to cure his chinchilla, and eventually the human race. Man meets hot scientist woman while she is polishing her shotgun on her porch. Hot scientist woman thinks the chinchilla may be the cure to the zombie apocalypse. After a lot of researching/adventures, it turns out the chinchilla is an imposter chinchilla alien who has been sent down to destroy Earth. Lots of fighting. Man and Hot Scientist kill off the chinchilla aliens by waking up ancient dragons and everything goes back to normal. Man and Hot Scientist kiss in the sunset.")

So now you know where you're going. The tricky thing about writing is that writers make it seem easy. It's so easy to read, but it's so much more difficult to write. All those clever subtleties and connections don't just -happen- thought, effort and time go into them.

Now your list/index cards/chart can fill in the details. What are their adventures? Who else do they meet? Who gets in their way? How do they summon these dragons? Subplot the hell outta this bitch. You can never have too much. If you feel like it's too much, write more. Add more. It will probably still not be enough. You can always take away minor events, but adding them is much harder when you're in the thick of NaNoWriMo Events. When you're writing a novel in a month, your brain will ultimately get fried, so it's better to come up with ideas and subplots now, while you're still able to process things.

So now you have an outline, for a book...your book. The hard part now is to find a way to pass the time until August 1st!

Friday, July 8, 2011

How to Make Awesomely Cheap, Easy and Fancy Candle Holders


This is a good project if you've had some old jars/vases/plain candle holders lying around and don't know what to do with them.

What you'll need:

-Jars (I actually found these candle holders "as is" in Michael's, because they were missing a part, for $1.50 each.)
-Yarn
- White Spray Paint (If you're like me and don't spray paint a lot, they make small cans of spray paint for super cheap in craft stores so you don't have to spend $6 on a can of spray paint you're going to use once. Also, I would imagine other colors would work just as well if you're going for something to brighten up your table a little more...I haven't tried it...yet :))
- Ribbon (or fabric)

How to do it:
1. Wrap yarn around jars, criss-crossing them to give them a pattern. Start from the bottom and end at the bottom, use tape to secure them, but make sure the tape is underneath the jar.
2. Spray paint! This was so fun. I'd never spray painted anything before and I may have over done it a little. I did about 2 coats, waiting for a little bit between them.
3. I think they look nice just like that, but to add a little more color, tie a bow with ribbon or a strip of fabric around the top of it. I'm looking forward to changing the color of it every so often :)

Enjoy!

Thursday, July 7, 2011

Inspiration Part 1

I recently heard a piece of advice, that I fully intend to take to heart:

"Feed your mind with the thoughts, words, and images that are most consistent with who you want to be, what you want to have, and what you want to achieve."

And what better place to put those things than in this blog. My space for creations, and of course, the source for those creations: the inspirations. I'll be making a post full of beautiful things every so often in hopes of inspiring myself, and maybe even a few other people.

Arthur Rackham is a Victorian era artist that I just discovered, and absolutely adore.

This picture was my desktop until just yesterday. A beautiful, strong fiery woman...why not me? I need a stronger backbone, and some fire behind my actions when I move, talk, smile and laugh.

So maybe not exactly the "inspirational" woman any person would put on their list, but she's beautiful and strong...maybe I just need to start doing some push ups in the morning? *Chuckles*


"Better a creative mess than tidy idleness"


Eyjafjallajokull.


"And in the middle of winter, I found there was in within me, an invincible summer"

“Fairy Tales are more than true; not because they tell us that dragons exist, but because they tell us that dragons can be beaten.”


If you, too, would like to be inspired, maybe improve an aspect or two of your life, and to see where I got this advice from you can go here.