I've had quite a bit of free time on my hands as of late. It's bittersweet, because while I enjoy hanging out, crocheting, writing, and eating Klondike bars, I also like doing things like making rent, paying my bills, and having enough money to buy more Klondike Bars when I run out. Since my hours have been cut so significantly at work, and I'm juggling my free time with being really poor, I thought I'd try something out for my fellow poor people.
In an attempt to help us out, I'm going to try a new thing I call One Skein Weekend. It's basically a few small projects that can be made with nothing more than a single skein of yarn. So if you have a full skein of yarn stashed away, or only want to spend less than $5 to keep yourself occupied over the period of a day or two, then maybe I can help you out. I am also, of course, only using patterns that are available for free, and will do my best to make things that make sense (So you don't have 4 hats in the same color, a bracelet made of wool, or a mug cozy made of thread, etc.).
This week I made three projects that all go together nicely in kind of a Spanish Pirate theme; A Lace Shawl, Mesh Wristers, and a Flower Headband. So, let's get started.
Here's the stats of what exactly I used:
Yarn: Bernat Satin
Color: Fern
Yardage: 200 Yards
Weight: Worsted
Price: (Not sure, it was a gift)
Extra stuff: One button (50 cents from Wal Mart)
First up is the "Lace So Simple" Shawl (The pattern can be found here)
This is 7 rounds, and uses an N hook. Big hook, a few rows? Takes a few hours, and probably about half of our allotted yarn (including the long tassels). I also used a button on this so it stays on my shoulders easier, and also easily turns into kind of a cool, Bohemian style scarf, the button clasp adding a little extra personality.
The actual pattern calls for teardrop crystals to hang off of the picots, but just looping the tassles through the right places looks fine, and costs less.
I had a lot of fun with this one, and I think it looks really nice. the sheen of the green yarn I used adds an extra magical element, and it's really good for covering shoulders (something I spend my days and nights looking for!). I think as a scarf it's good for fall, and as a wrap it's good for spring, and I've been using it indoors when I'm at home, not quite cold enough for a blanket or sweater, but just want something over my shoulders. These are also elegant and bohemian enough to whip up for some last minute Christmas gifts.
Next up are our Ivy Wristers (Pattern can be found here, as a free Ravelry download)
These use an I hook, and are the fastest wrist warmers I have ever made. I adapted the pattern a bit, with a starting chain of 35 instead of 29, and I did 12 rows instead of 10. They fit nicely, and are perfect for when my hands get chilly during NaNoWriMo (or blogging...yes, I am wearing them right now :)). Normally I'm a bit wary of the wrist warmer method of making a rectangle and folding it over, but this pattern is small enough that it works really well without being clunky, and actually fits the hand shape nicely.
The pattern itself took only a little while, and is just a quick motif repeated over and over and over again, making for an interesting pattern.
....Now~ ...
...Before you run off and make these, I have a bit of a disclaimer. Since I adapted the pattern to be bigger, I came VERY close to running out of yarn before finishing the final project. This is how much yarn I had left:
So, if you don't want to cut it that close, I recommend doing less than twelve rows. But, if you like to live on the edge, then go for it! Just be conservative with your yarn from here on out. Let me know how it goes for you!
And finally, our flower headband (Pattern can be found here)
This was a super cute project, and was rather interesting to put together (sewing the large flower to the 3 chain headband). I used an H hook for the flower, and an F Hook for the chains (the F hook being very important to not running out of yarn :P). Despite how big the flower is, I was actually surprised at how cute it turned out. I don't feel like it's gaudy at all, I just don't know when I'm going to wear it! Hopefully I'll manage to get some use out of it.
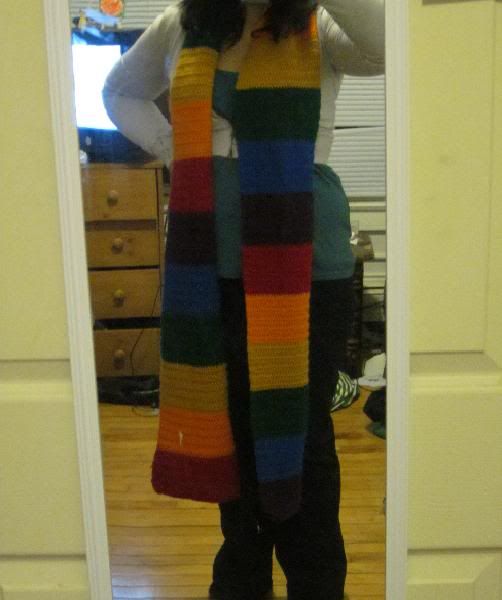
All together now!
So this is what it all comes together to be! Mine is a nice...radioactive hobo Spanish pirate theme :)
Isn't stash busting fun? I've been making a lot of little projects lately, and since I don't have any extra money to buy more yarn, my stash is certainly dwindling beautifully :P
Want more stash busters? Wanna see the other cool projects I've been working on? You know I'll be back with some kind of goodies soon enough.
This blog was born from my inability to express myself through anything besides the things I create with my hands. From baking to writing, I love expressing myself, and maybe even teaching and inspiring other people to do so along the way.
Showing posts with label scarf. Show all posts
Wednesday, November 14, 2012
Friday, June 10, 2011
Crochet Compendium, and a modified pattern.
I honestly don't remember the last time I finished 3 projects in a day, so I'm feelin' pretty good about today. It was definitely a lazy day, though. After working 8 days in a row, then 4 days of temperatures in the 90s, I more than welcomed a day all to myself with temperatures in the mid 60s. I spent probably about 10 hours of my day crocheting today, and it just wouldn't be me if my posts weren't made around 3 AM ;)
1. Gypsy Head Scarf
This took all of an hour and a half, and looks really nice. The yarn I used was Lion Brand's Tweed Stripes in the "Caribbean" colors. The pattern called for a ch of 144, but I did 154 and I still felt as though it was a tad short (though, I like my head scarf ends to go like 5 or 6 inches past my shoulders). This just touched my shoulders. Like I said, though, definitely happy with the results, and how quickly it went.
2. Sushi Roll Scarf
I have actually been working on this for about 2 weeks now, but finally managed to finish it today. This is actually a wedding gift for someone I've only met a handful of times, but whose wedding I'll be attending later this month. The only reason I did a handmade gift was because, well, first of all, those are the only gifts they're accepting, and they're refusing to accept store-bought gifts, but have set up a donation to a charity if anyone feels like they have to spend money on them. I loved that so much, that I vowed to make something for them (read: her) if for nothing else than to show my gratitude about how she's handling her wedding.
All in all, it was a fun project at first, but when I got to the 36" of white for the 'rice' I got really bored, and subsequently frustrated with how bored I was getting. By the end, I was happy to be done. The project is a cute idea, but I think it was a little too simple for how ambitious I've been feeling lately when it comes to my crocheting.
3. Turtle Power Mug Cozy
First of all, this concept is awesome. What wasn't awesome, was thinking "Hey! Here's an easy 2 hour project!" and then spending roughly 7 hours on it. I think part of the problem was that the mugs the original pattern-writer used were smaller than the mugs I use. While her pattern totals 16 rounds, mine is 23...so I definitely think something was off. I edited the pattern for those whose mugs are 3.75" high.
(I'm copying and pasting most of her original pattern, but will put my changes in bold.)
Materials:
-Worsted weight yarn in green, white, black, and orange (substitue red for Raphael, purple for Donatello, or blue for Leonardo).
-G Hook for cozy and whites of eyes
-E Hook for pupils (I used an H hook the whole way through)
-Tapestry needle
Gauge:
Base rounds 1-7 = 3 inches = Base of a standard coffee mug
Special Stitches:
hdcdec: Half double crochet decrease (yo, insert hook in next st, yo pull up loop, yo, insert hook in next st, yo pull up loop, yo, pull through all 5 loops on hook)
Base worked in continuous rounds
R1: With green and using G hook, ch 2, 6 sc in second ch from hook (6sc)
R2: 2 sc in each sc around (12sc)
R3: *2sc in next st, sc* 6 times around (18sc)
R4: *2sc in next st, 2sc* 6 times around (24sc)
R5: *2sc in next st, 3sc* 6 times around (30sc)
R6: *2sc in next st, 4sc* 6 times around (36sc)
R7: *2sc in next st, 5sc* 6 times around (42sc)
R8: 1 sc in each sc (42 sc)
Sides worked in rows back and forth (I worked the 1st part of these in rounds (before the opening for the handle), mostly due to mis-reading the pattern, and it still worked out.)
R9: ch 1 (does not count as stitch now and throughout), in back loop only hdc in each st around. ss to first hdc. ch 1, turn (42hdc)
R10: Working in both loops, hdc in each st around. ss to first hdc, ch 1, turn. (42 hdc)
R11: Working in both loops, hdc in each st around. ss to first hdc, ch 1, turn. (42 hdc)
R12: hdcdec over next 2 sts, 38hdc, hdcdec over last 2 sts, ch 1, turn. Do not join to first stitch of this row. (40 hdc)
R13: hdcdec over next 2 sts, 36hdc, hdcdec over last 2 sts, ch 1, turn. (38hdc)
R14 - 15: hdc in each st around. (38hdc)
R16: hdc in each st around, finish off, cut green. (38hdc)
R17: join orange with ss, ch 1, hdc in each st around, ch 1, turn. (38hdc)
R18 - 20: hdc in each st around, ch 1, turn. (38hdc)
R21: hdc in each st around, finish off, cut orange. (38hdc)
R22: join green with ss, ch 1, hdc in each st around. (38hdc)
R23: join green with ss, ch 1, hdc in each st around, finish off, cut green. (38hdc)
Ties
Using H hook join orange with ss at end of R20, ch 30, sc in second ch from hook and in next 3 sts, hdc to end of ch, ss to end of R21, cut orange. (4sc, 25hdc)
Repeat tie on opposite end of mug.
Eyes
R1: With white and using H hook, ch 2, 6sc in second ch from hook. Do not join to first st. (6sc)
R2: 2sc in each st around, ss to first st, cut white. (12sc)
R3: *2sc in next st, sc* 6 times around (18sc)
R4: Join orange with sc in any st, sc in each st around, ss to first st, leave long tail for sewing and cut orange. This last row will want to curve a bit. That's ok. It will flatten when you sew it to the sides of the cozy.
Pupils
R1: With black and using H hook, ch 2, 10sc in second ch from hook, ss to first sc, leave long tail for sewing and cut black. (10sc)
Sew pupils to eyes using black tail from pupil.
Fold cozy in half, place one eye on orange headband to left of fold and the other eye to the right leaving a small space between. Sew eyes to headband using orange tail from eyes.
Weave in ends.
Just to clarify, I did not create this pattern, I have only modified it. For the original pattern scroll up and click the link that says "Turtle Power Mug Cozy".
(Giant words are there thanks to amean concerned woman who accused me of stealing her pattern on Ravelry...but that's a long story for a different day. I just want to make sure I cover my ass so no one else gets mad.)
1. Gypsy Head Scarf
This took all of an hour and a half, and looks really nice. The yarn I used was Lion Brand's Tweed Stripes in the "Caribbean" colors. The pattern called for a ch of 144, but I did 154 and I still felt as though it was a tad short (though, I like my head scarf ends to go like 5 or 6 inches past my shoulders). This just touched my shoulders. Like I said, though, definitely happy with the results, and how quickly it went.
2. Sushi Roll Scarf
I have actually been working on this for about 2 weeks now, but finally managed to finish it today. This is actually a wedding gift for someone I've only met a handful of times, but whose wedding I'll be attending later this month. The only reason I did a handmade gift was because, well, first of all, those are the only gifts they're accepting, and they're refusing to accept store-bought gifts, but have set up a donation to a charity if anyone feels like they have to spend money on them. I loved that so much, that I vowed to make something for them (read: her) if for nothing else than to show my gratitude about how she's handling her wedding.
All in all, it was a fun project at first, but when I got to the 36" of white for the 'rice' I got really bored, and subsequently frustrated with how bored I was getting. By the end, I was happy to be done. The project is a cute idea, but I think it was a little too simple for how ambitious I've been feeling lately when it comes to my crocheting.
3. Turtle Power Mug Cozy
First of all, this concept is awesome. What wasn't awesome, was thinking "Hey! Here's an easy 2 hour project!" and then spending roughly 7 hours on it. I think part of the problem was that the mugs the original pattern-writer used were smaller than the mugs I use. While her pattern totals 16 rounds, mine is 23...so I definitely think something was off. I edited the pattern for those whose mugs are 3.75" high.
(I'm copying and pasting most of her original pattern, but will put my changes in bold.)
Materials:
-Worsted weight yarn in green, white, black, and orange (substitue red for Raphael, purple for Donatello, or blue for Leonardo).
-E Hook for pupils
-Tapestry needle
Gauge:
Base rounds 1-7 = 3 inches = Base of a standard coffee mug
Special Stitches:
hdcdec: Half double crochet decrease (yo, insert hook in next st, yo pull up loop, yo, insert hook in next st, yo pull up loop, yo, pull through all 5 loops on hook)
Base worked in continuous rounds
R1: With green and using G hook, ch 2, 6 sc in second ch from hook (6sc)
R2: 2 sc in each sc around (12sc)
R3: *2sc in next st, sc* 6 times around (18sc)
R4: *2sc in next st, 2sc* 6 times around (24sc)
R5: *2sc in next st, 3sc* 6 times around (30sc)
R6: *2sc in next st, 4sc* 6 times around (36sc)
R7: *2sc in next st, 5sc* 6 times around (42sc)
R8: 1 sc in each sc (42 sc)
Sides worked in rows back and forth (I worked the 1st part of these in rounds (before the opening for the handle), mostly due to mis-reading the pattern, and it still worked out.)
R9: ch 1 (does not count as stitch now and throughout), in back loop only hdc in each st around. ss to first hdc. ch 1, turn (42hdc)
R10: Working in both loops, hdc in each st around. ss to first hdc, ch 1, turn. (42 hdc)
R11: Working in both loops, hdc in each st around. ss to first hdc, ch 1, turn. (42 hdc)
R12: hdcdec over next 2 sts, 38hdc, hdcdec over last 2 sts, ch 1, turn. Do not join to first stitch of this row. (40 hdc)
R13: hdcdec over next 2 sts, 36hdc, hdcdec over last 2 sts, ch 1, turn. (38hdc)
R14 - 15: hdc in each st around. (38hdc)
R16: hdc in each st around, finish off, cut green. (38hdc)
R17: join orange with ss, ch 1, hdc in each st around, ch 1, turn. (38hdc)
R18 - 20: hdc in each st around, ch 1, turn. (38hdc)
R21: hdc in each st around, finish off, cut orange. (38hdc)
R22: join green with ss, ch 1, hdc in each st around. (38hdc)
R23: join green with ss, ch 1, hdc in each st around, finish off, cut green. (38hdc)
Ties
Using H hook join orange with ss at end of R20, ch 30, sc in second ch from hook and in next 3 sts, hdc to end of ch, ss to end of R21, cut orange. (4sc, 25hdc)
Repeat tie on opposite end of mug.
Eyes
R1: With white and using H hook, ch 2, 6sc in second ch from hook. Do not join to first st. (6sc)
R2: 2sc in each st around, ss to first st, cut white. (12sc)
R3: *2sc in next st, sc* 6 times around (18sc)
R4: Join orange with sc in any st, sc in each st around, ss to first st, leave long tail for sewing and cut orange. This last row will want to curve a bit. That's ok. It will flatten when you sew it to the sides of the cozy.
Pupils
R1: With black and using H hook, ch 2, 10sc in second ch from hook, ss to first sc, leave long tail for sewing and cut black. (10sc)
Sew pupils to eyes using black tail from pupil.
Fold cozy in half, place one eye on orange headband to left of fold and the other eye to the right leaving a small space between. Sew eyes to headband using orange tail from eyes.
Weave in ends.
Just to clarify, I did not create this pattern, I have only modified it. For the original pattern scroll up and click the link that says "Turtle Power Mug Cozy".
(Giant words are there thanks to a
Labels:
crocheting,
geeky art,
head scarf,
mug cozy,
patterns,
scarf
Tuesday, June 7, 2011
Rainbow Scarf With Clouds
I made this scarf about 2 months ago or so, and since I just (finally) typed out the pattern on Ravelry, I figured I may as well write it out here, as well.
This pattern will use a single crochet, so your rainbow will be bright, and dense. This is definitely an improvement upon my last rainbow scarf, and as a matter of fact, this was the scarf I was wearing when someone stopped me on the street to ask me where I bought it. When I told them I had made it myself, they offered to buy a scarf from me! I have also received a -ton- of compliments on it, including a woman who told me I have the best single crochets she's ever seen, and if she didn't see me making it, she would think it had been done by a machine.
But don't get all intimidated by my ego here. When I made this scarf I had only bee crocheting for 9 months. I just practice a lot. Nothing crazy here. Also, I know the clouds look intimidating, but I promise those are easy, too!
This is the 1st pattern I’ve written out, so please let me know if anything is unclear.
Stitches (and abbreviations) you’ll need to know for this pattern:
ch - chain
sl st - slip stitch
sc - single crochet
ps - Puff stitch
For Puff stitch:
-Wrap the yarn over the hook, insert the hook below the chain. Wrap the yarn over the hook and draw through. There will be 3 loops on the hook.
-Wrap the yarn over the hook, insert the hook below the chain. Wrap the yarn over the hook and draw through. There will be 5 loops on the hook.
-Wrap the yarn over the hook, insert the hook below the chain. Wrap the yarn over the hook and draw through. There will be 7 loops on the hook.
-Wrap the yarn over the hook, pull the yarn through all 7 loops.
-Wrap the yarn over the hook, pull through(chain) to secure puff stitches at the top.
To make clouds:
ch 4. sl st to connect them in a circle. ch 1. Make 8 ps within ring. Connect ps with a sl st. ch 1. Now do 2 ps in the space between each ps. You will now have 16 ps. connect with a sl st. ch 1. Work 1 sc in the ps, and 1 sc in the space all the way around the circle. You will have 32 sc. Connect and tie off.
Repeat this circle 20 times.
Tie in all loose ends.
Using a tapestry needle, sew 3 circles together in a line, then 2 on top to make sort of a ‘pyramid’ (as pictured). Repeat this 4 times so you will have 4 ‘clouds’. Make them as symmetrical as possible.
Put the ‘wrong sides’ of 2 clouds together and connect them by sewing together the bottom 3 circles. Leave the top 2 circles open and un-sewn for now. So you will now have 2 clouds.
To make the rainbow:
Chain approximately 300 red. sc in every space. sc 4 rows, follow that with 4 sc rows of orange, yellow, green, blue, purple. This makes the rainbow approximately 5 1/2” wide and will fit nicely within your clouds.
Putting it all together:
Tuck the ends of the rainbow in between the open space of your clouds. Using white yarn and a tapestry needle, sew the clouds on your rainbow. Be sure your rainbow is exactly perpendicular to the clouds so it doesn’t get sewn on crookedly. Also, be sure to close up the sides of the clouds that aren't on the actual rainbow. Do this twice.
Now you have a dense, bright rainbow, and with the clouds on both sides of the rainbow, there is no ‘right’ or ‘wrong’ way to wear it!
This is fairly time consuming, and requires a lot of patience (especially sewing the clouds to the rainbow without making it a crooked mess, not to mention doing a scarf completely in sc), but the results are worth it.
Enjoy!
Tuesday, March 15, 2011
Restoring my faith in humanity, one rainbow crochet project at a time.
I grew up in conservative Virginia, then I moved from conservative Virginia to conservative Wisconsin. I didn't think much of it growing up, on account of that was what I had known my whole life. It wouldn't have been an issue if I, too, were as close-minded as the people I went to school with and lived near, but I was different as soon as I had a concept of normalcy. I was a little different, and people responded cruelly. People were just rude, and that was something I dealt with. At certain times I dealt with it better than others, but it's just what I did.
When I moved to Madison (my first liberal city) last summer, people were still mean, but in a different way, and I had a more difficult time dealing with it. I tried different things, I tried ignoring it, I tried laughing it off, I even tried my tried-and-true methods of getting defensive and angry, but I found out that people were still just people. No matter where you go. It turns out that whether someone is liberal or conservative, they still occasionally feel the need to take their angst out on innocent bystanders. Say, the girl behind the counter selling movie tickets.
It wasn't until I decided to take on the task of making a rainbow scarf measuring 1.5 feet wide, and roughly 9 feet long that I realized how great living in Madison really is. I crochet at work quite a bit, and I get plenty of compliments, most of which I can smile coyly, mumble a 'thank you' and sell the nice person their movie tickets. In the past it's been everything from getting embarrassed about making a Gryffindor scarf, to faking conversations with people because I didn't have the guts to tell them I was crocheting, not knitting.
Then I brought the rainbow scarf to work. It wasn't a big deal to me. I was just going to crochet at work, I was expecting some slack for making it so big, but I didn't think that would be the worst of it. I can still hear people from the previous places I'd lived in taunting me, "What're you gay or something?"
No, I just like rainbows?
From being called a faggot, to being harassed to make out with other girls, I've heard it all. I was kind of nervous to bring a rainbow into public, maybe suffering from some PTSD, but my skin is thick, I even had comebacks ready.
So I'm at work, and an older woman comes up to the counter and says "Oh, I just love the colors!" Well that's new. Is someone actually just seeing this scarf for what it is: gloriously bright, bold, a little tacky and really loud? Well, yes, but maybe it's a fluke.
Then it happened again, and again. I heard it so many times, and every time I did I just warmed my heart. Then the 1st really wonderful thing happened. An older woman came up and complimented it (blush, nod, say thank you, just like always), then asked me how long have I been crocheting.
"Oh, just since June."
"Just since June?" I thought she was going to tell me I should be further along, that I should be working on other things besides scarves, or to tell me that I had all winter to make scarves, and now it's March, learn to make something else, junior. But what she said threw me for a loop, and inspired the rest of my week.
"I've been thinking about signing up for a knitting class, but I didn't think I'd be able to do it, and seeing this, it's such an inspiration!" It was better than anything anyone had said to me in a long while. I barely knew what to do, the blushnodthankyou routine didn't work here, and my sincerest thanks rushed out of me, and I grinned. I grinned at work.
The scarf took me two weeks to complete. I worked on it everyday, and 10 out of those 14 days, I was at work for the majority of my work on it for the day. Not only had people been complimenting it, but I found that the general kindness I'd experienced was changing me. Suddenly no one was yelling at me. No one was telling me their life story and how hard it is to be them, and certainly no one has been calling me names. It wasn't that the 200,000 people of Madison suddenly liked me, but rather I was actually cheerful, and I was smiling at people, and being social and expressing myself to strangers in a positive way.
Many other things happened. I talked to many women about places to go for good yarn in Madison, I learned tips, I was generally inspired to keep moving forward with crocheting as a hobby. I regained faith in people, maybe not completely, but enough to grin at work, enough to smile at strangers, and enough to know that I can work on a rainbow for 10 days and not have a single person harass me for "being gay".
What a lovely city I live in.
Subscribe to:
Posts (Atom)