So it's 4 hours before 2012, and with everyone doing their own lists of resolutions, best and worst of, or personal experience lists, I decided to try to get my voice heard one last time about 5 movies that just can't seem to get the credit they deserve. These are all smaller films, but nonetheless, films that I really couldn't shake, and changed something about myself, if even in the smallest way.
5. Life In A Day
(You can watch the entirety of this movie here)
Perhaps not necessarily underrated, as it seems as though the few people who DID see it liked it, but the concept seems to be too strange for many people to give it a shot.
So it's all footage filmed by amateurs, then put together by National Geographic to 'mimic' everything a person can go through in their life by watching many different people of different cultures go throughout their normal day. It seems like a lot of people thought this could go wrong, and steered clear. However, it was done very well, the clips being put in chronological order according to the time of day Not to mention, considering the THOUSANDS of hours of footage they received, I was VERY impressed with the clips they did choose.
I also heard a lot of people complaining about the 'violent' parts, but isn't that part of life? Life is not all great quotes and getting engaged and baby giraffes and being inspiring. Life is depressing, and there are people out there who DO slaughter cattle for a living, and cry during thunderstorms. This is all part of it, and this was why this movie was great.
My absolute favorite part of this film is the fact that those sending in footage were asked to answer a series of questions. Ranging from "What do you love?" to "What's in your pocket or purse?" These answers really give a lot of insight into different people, cultures, and a lot of it was eerily relatable.
4. Everything Must Go
Maybe you're not a huge Will Ferrell fan, but just listen for a minute. He plays an alchoholic, fired, and thrown out of his house by his wife in the same day. Drinking PBR like his life depends on it, he lives on his front lawn (where his wife has thrown all of his things), and while he tries to figure things out, turns it into a yard sale so as not to be arrested. Battling with his addiction, possible homelessness, and a bank account he can't access,, this movie was surprisingly emotional.
If you normally write him off, don't. His acting is phenomenal, and brought me to tears at one point, some of the issues in the movie hitting really close to home, and Ferrell's character pulling it off tremendously. Biggie Smalls' son plays the cute little boy that gives him some hope, and really, it all comes together beautifully. It's an original idea, with an unexpected performance, and an unexpected emotional rollercoaster.
3. Tree of Life
I honestly can not tell you how many refunds I gave to customers because of this movie. The hatred of this movie was so intense, that it got to a point where I couldn't wait to see it just so I could hate it, too. From what I heard, it didn't make sense, nothing was connected, and everything was abstract.
Well, frankly, this was one of the better movies I saw this year, but hey, not because it wasn't abstract.
This movie is about death, and grieving, and trying to figure out death, and I get that. When someone you love dies, it's so hard to figure out. Why are we here, if we're just going to die? God, why did you take them from me? The questions seem as endless as they are unanswered, and your mind wanders to a grand scale...this is what that movie is. This movie takes the thoughts and feelings you have when your loved one dies and shows it on a screen. A beautiful movie, with a beautiful message.
Although it can be a bit abstract at times, just sit back, and relax. Don't ask anything of the movie, don't look for anything, just watch, and wait.
2. Detective Dee and the Mystery of the Phantom Flame
The first time I heard the title of this movie, I choked a little from laughing. I had NEVER heard of it, and I was certain it was just a dumb kids movie. Looking into it, though, I had never been more intrigued. China's first empress is about to come into power when those around her begin to spontaneously combust. Detective Dee is a clever man with many tricks and fighting moves up his sleeve, and the movie is beautiful, filled with magic, fighting, mystery and twists and turns.
Not to mention, this movie is based on old Chinese Folklore that include 7 stories about a "Judge Dii." And, above all, the plot was so clever, I found myself at the edge of my seat throughout nearly the entire thing. It's astounding how silly this movie both looks, and sounds, when really, it's a gorgeous and witty film, possibly one of the best I've seen in a long time.
1. Today's Special
I have found almost no one who has ever heard of this movie, and it really, truly baffles me. Written and directed by Aasif Mandvi, it's a story about someone looking to be a truly great world class chef, but doesn't get that final promotion due to his inability to be spontaneous with his cooking (and of course with his life). When his father has a heart attack, he's forced to take over his rock-bottom Indian restaurant. With the help of an endearingly mysterious Indian cab driver, he learns how to improve his cooking (and his life of course)!
By far the most inspiring and feel-good movie I've seen in a long time, this one really stuck with me for a good while, and I still think about it. For such a small movie, it really had an amazing impact on me, and I try to share it with as many people as I possibly can. Last winter when people were talking about how inspiring the King's Speech was, no one believed me that this movie could give it a run for it's money, but I honestly thought this movie was stronger in characters and in message.
Saturday, December 31, 2011
Thursday, December 29, 2011
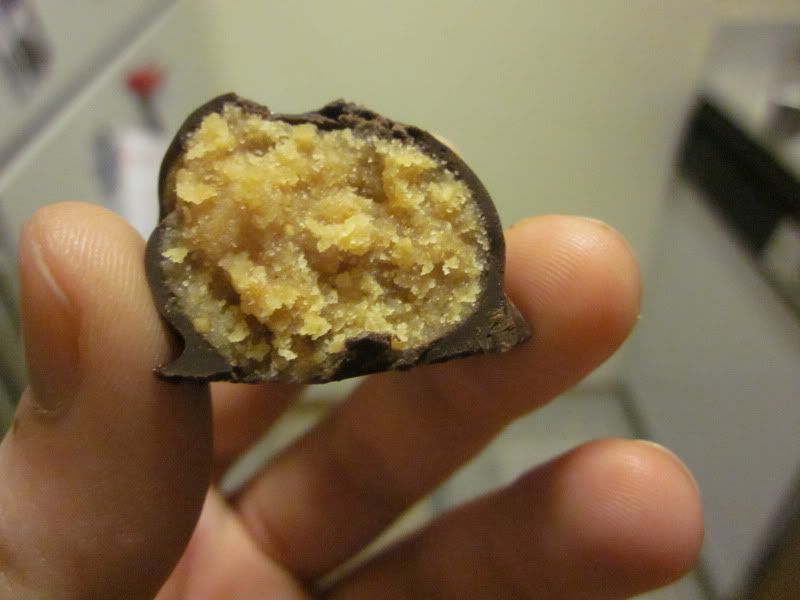
Holiday Confections Part Two: Buckeyes
Buckeyes are a strange thing for me. I know it's rare to relate something BAD to something as delicious as a buckeye (It's peanut butter, cream cheese, and powdered sugar...covered in chocolate...what's so bad about it, right?), but somehow, I managed to have that happen to me.
When I was younger, I had more step-family than family, and I was certainly not a favorite at family gatherings (or in my case, step-family gatherings). I had a step-grandma who lived in Ohio and when she came down, everyone seemed really happy to see her, but I absolutely hated her. She was mean to me, rude to me, put me down, and hurt me (emotionally and physically). And you know what she always made as a treat? You guessed it. Buckeyes.
They were good. Damn good, actually. Probably the only good thing about her, in all honesty. I ate these things year after year, finding some odd kind of relief to her visits in these little peanut buttery truffles, and it wasn't until this year that I realized that she was the only thing I related to these treats.
Here I am, trying to make something delicious and nice for my co-workers, and I find myself grinding my teeth, holding my hand mixer so tightly my knuckles are turning white, and an inexplicable lump is forming in my throat, and as desperate as I am to think of something, anything, else, she is all I can think of. I thought I had buried the hatchet long ago, but apparently deciding to make something beautiful and delicious was enough to open that can of worms again.
I felt annoyed once again, that even in absence (and in death), this woman is still getting the last laugh.
So, I decided to make these every year until the price of peanut butter is just too damn high for my budget.
These are so good you guys, SO good, and I refuse to think of her when I make, and subsequently eat, these. I want to think about my own Christmases, holidays and friends, and my own moments, in my own life, with my boyfriend and maybe someday my kids and grandkids (and hopefully said grandkids will not think of me the way that I think of her). I want this to be something I can make with a smile on my face, a flutter in my heart, and a twinkle in my eye as I salivate thinking about how impossibly good these are.
So without further ado, here is the recipe to the most insanely, impossibly and beautifully delicious thing I have made in a long time. Something so amazing, that I am unearthing issues long dead so I can eat these and have absolutely perfect moments when I do (and I hope you will, too).
Buckeyes
Ingredients:
-1/4 Cup Cream Cheese (softened)
- 1 1/2 Cup Peanut Butter
- 1 Cup Graham Cracker Crumbs
- 1/4 Tsp. Salt
- 3 Cups Powdered Sugar
- 10 TBS. Unsalted butter (melted and cooled)
- 12 Oz. Dark chocolate (60 - 75%) coarsely chopped
How to do it:
For the filling:
1. Beat cream cheese and peanut butter until combined.
2. Add Graham cracker crumbs, beat 10 seconds.
3. Add sugar and butter. Mix on lowest speed until nothing in floating in the butter, then increase speed until ingredients are combined.
For the coating:
Melt chocolate in microwave according to package directions. Cool until tepid.
For assembling:
1. Line baking sheet with parchment paper
2. Scoop out roughly 1 TBS of filling, and use hands to form into a ball.
The balls can sit close to each other, but make sure they don't touch.
3. Using a spoon, roll each ball in the chocolate until it is covered.
4. Refrigerate or freeze.
5. Indulge.
When I was younger, I had more step-family than family, and I was certainly not a favorite at family gatherings (or in my case, step-family gatherings). I had a step-grandma who lived in Ohio and when she came down, everyone seemed really happy to see her, but I absolutely hated her. She was mean to me, rude to me, put me down, and hurt me (emotionally and physically). And you know what she always made as a treat? You guessed it. Buckeyes.
They were good. Damn good, actually. Probably the only good thing about her, in all honesty. I ate these things year after year, finding some odd kind of relief to her visits in these little peanut buttery truffles, and it wasn't until this year that I realized that she was the only thing I related to these treats.
Here I am, trying to make something delicious and nice for my co-workers, and I find myself grinding my teeth, holding my hand mixer so tightly my knuckles are turning white, and an inexplicable lump is forming in my throat, and as desperate as I am to think of something, anything, else, she is all I can think of. I thought I had buried the hatchet long ago, but apparently deciding to make something beautiful and delicious was enough to open that can of worms again.
I felt annoyed once again, that even in absence (and in death), this woman is still getting the last laugh.
So, I decided to make these every year until the price of peanut butter is just too damn high for my budget.
These are so good you guys, SO good, and I refuse to think of her when I make, and subsequently eat, these. I want to think about my own Christmases, holidays and friends, and my own moments, in my own life, with my boyfriend and maybe someday my kids and grandkids (and hopefully said grandkids will not think of me the way that I think of her). I want this to be something I can make with a smile on my face, a flutter in my heart, and a twinkle in my eye as I salivate thinking about how impossibly good these are.
 |
| I know my photography has been lacking lately...but will return to somewhat normal soon! |
So without further ado, here is the recipe to the most insanely, impossibly and beautifully delicious thing I have made in a long time. Something so amazing, that I am unearthing issues long dead so I can eat these and have absolutely perfect moments when I do (and I hope you will, too).
Buckeyes
Ingredients:
-1/4 Cup Cream Cheese (softened)
- 1 1/2 Cup Peanut Butter
- 1 Cup Graham Cracker Crumbs
- 1/4 Tsp. Salt
- 3 Cups Powdered Sugar
- 10 TBS. Unsalted butter (melted and cooled)
- 12 Oz. Dark chocolate (60 - 75%) coarsely chopped
How to do it:
For the filling:
1. Beat cream cheese and peanut butter until combined.
2. Add Graham cracker crumbs, beat 10 seconds.
3. Add sugar and butter. Mix on lowest speed until nothing in floating in the butter, then increase speed until ingredients are combined.
For the coating:
Melt chocolate in microwave according to package directions. Cool until tepid.
For assembling:
1. Line baking sheet with parchment paper
2. Scoop out roughly 1 TBS of filling, and use hands to form into a ball.
The balls can sit close to each other, but make sure they don't touch.
3. Using a spoon, roll each ball in the chocolate until it is covered.
4. Refrigerate or freeze.
5. Indulge.

I'll be back soon with another recipe!
Tuesday, December 20, 2011
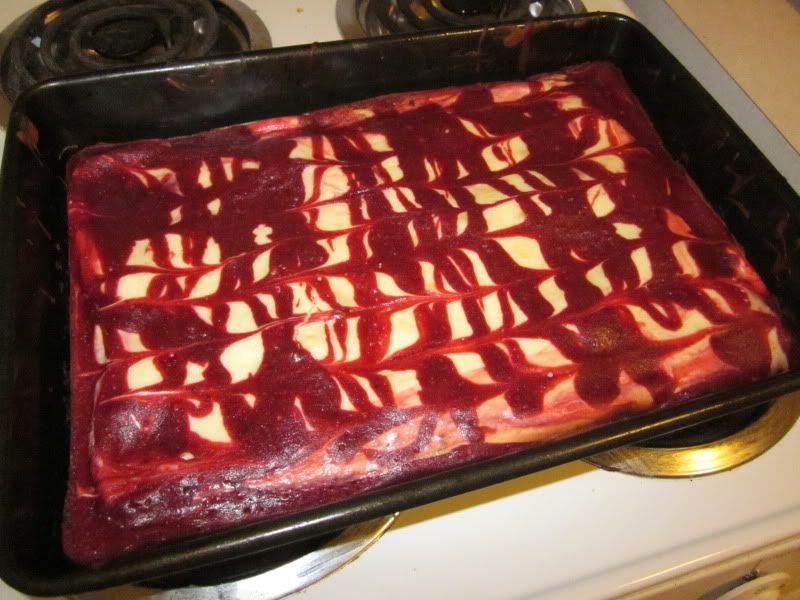
Holiday Confections Part One: Red Velvet Cheesecake Brownies
Hey everyone! I know it's been a few weeks, but I haven't been absent for a lack of creating.
Quite the opposite, actually.
I've been making so many things for the last month, but since ALL of them are Christmas presents, I can't post them without ruining the surprise for my friends. So, after Christmas, prepare to be so sick of my posts that you wanna vomit, while simultaneously thinking I'm really impressive. It's okay, I won't judge.
Anyway, I'm here today with one of 5 recipes I'm making for Christmas day.

These brownies are really delicious. Rich, but not too heavy, and the apple cider vinegar really comes through in the brownies subtly enough for some interesting flavor, while still being plenty chocolate-y and covered in a thick layer of cream cheese.
The recipe I'm providing is for enough brownies for a 9" x 13" pan, but if you half the ingredients, you can make it in an 8" x 8" pan, like brownies are generally made in (I just needed a lot of brownies!)
Red Velvet Cheesecake Brownies
Ingredients:
Red Velvet Layer:
- 2 Sticks unsalted butter, melted
- 2 Cups sugar
- 2 tsp Vanilla Extract
- 1/2 cup cocoa powder
- A pinch or two of salt
- 2 Tablespoons red food coloring
- 2 tsp. Apple cider vinegar
- 4 eggs
- 1 1/2 Cups all purpose flour
Cream Cheese Layer:
- 16 oz. Cream cheese, softened
- 1/2 cup sugar
- 2 eggs
- 1 tsp vanilla extract
- Preheat oven to 350 degrees, and grease a 9" x 13" pan.
Brownie Layer Instructions:
1. Add melted butter to large bowl and add the sugar, vanilla, cocoa powder, salt, food coloring and vinegar, mixing after each addition.
2. Whisk the eggs in a small bowl, and stir into cocoa mixture.
3. Fold in flour until lightly combined.
4. Pour batter into prepared baking pan, saving 1/2 cup of batter for the top.
Cream Cheese Layer Instructions:
1. Blend together all ingedients in a bowl.
2. Spread cream cheese layer on top of the brownie batter in the pan. Drizzle the remaining batter on top, and use a knife to drag through the cream cheese mixture to create a swirl pattern.
3. Bake at 350 degrees for 35 - 40 minutes.
 |
| Drizzle batter back and forth like so |
 | ||||||||||||
| Drag knife through in opposite directions to make this pattern |
Wednesday, November 30, 2011
November 30th - A novel reflection
 |
I may have hit 50,000 words 2 weeks ago, but I finished the novel tonight. What a strange and glorious feeling, to know you have written a book, to know you have told a story, and to know that so much of yourself has been poured into something so grand, so outrageously colossal, and to still feel as though there is so much more to be said.
Looking back at the last three NaNoWriMo events, how much has changed, how it's so strange to have such a good grip on how much 50,000 words really is. It seems like nothing now.
2009 was my first year, and by far the hardest. I had no plot, no real idea of where I was going, plenty of breakdowns and as I recall correctly, quit multiple times throughout, then finished with 50,003 words.
2010 was my moment of true glory. A single dream fueled 68,000 morbid and beautiful words of historical fiction. Strange tides swept over everything I had to say, and twists and turns made the story stranger and harder to follow, yet easier and easier to write with each passing day. In June, I ordered a hard copy and tried to keep myself from jumping around like an idiot as I grasped it in my hands so tightly, as if it would float away. What a glorious, glorious month.
Camp NaNoWriMo was this past August, and I wrote 50,000 words about lesbian vampires despite everything. My asthma was the worst it'd ever been, and I was drinking cough syrup in hopes for even the slightest bit of relief, out of the house for 14 hours at a time, sometimes falling asleep at my computer after writing 200 words. What an awful and terribly exhausting month, but I did it. Maybe I did it just to boast, but whatever the reason, it was done.
This year, I had no outline and just a vague idea of where I was going based on what was written in my first part. 50k in 15 day. FIFTEEN DAYS. I felt on top of the world, and tonight I capped it off with the last 2,000 words, totaling the two parts together for a gloriously beautiful 106,500 words, and nearly 350 pages of sexually confused vampire goodness.
I wonder what's in store for next year. I wonder what I'll write about, and I wonder if I could do 100,00 words in a month. I wonder if I'll want to do it next year, and I wonder what the editing process for such a long book as this one will be like.
The adventures of writing are adventures like no other. The fact that I have written a total of 200,000+ words, and learned more about myself within those words than any other form of creativity makes me SO confused that not every single person on this planet does this at least once in their life.
Happy writing, everyone!
Monday, November 28, 2011
Queen Anne's Lace
So, I know I'm rather hyperbolic. Every single thing I tend to do, see or eat becomes the best thing ever, and I'm aware of that.
But, I think Queen Anne's Lace might actually be the most beautiful thing in the world.


I recently discovered a pattern for it and decided to try to tackle it. It took me a little while to get the hang of it, but once I did, I was totally hooked (HAH. CROCHET PUN!). I used Caron Simply Soft and made a couple pieces of jewelry, which fit softly and snuggly around your neck without being too warm or bulky.
My only issue with Queen Anne's Lace is that I don't know how to make more than one row with it :( From what I can tell, there is no way to turn and start a row on top of the row just made. Does anyone know of a way to do this? Because every pattern I find is for just one row, and I would really like to do more with it!
My first necklace was a beige color, and I made it extra long, then attached a button to one end. It's really nice, because the holes that the Queen Anne's Lace makes can be clasped around the button to give the necklace different looks.


While I'm not exactly sure what I can wear this with, I DO know that I LOVE it! I will get a whole new wardrobe if I have to.
The second piece of jewelry I made was actually shorter, just a choker. However, I didn't find myself as infatuated with this one. Perhaps the color is too dull, or perhaps thick chokers just aren't for me, but I think it just looks rather awkward. I decided to use brown, since I own so many earth-toned clothes, but maybe something brighter would have been a better idea.

I might give this another shot in a brighter color. We'll see.
The tutorial I used for this can be found here. The tutorial provides a lot of pictures that are very easy to follow, but I wouldn't recommend trying this out unless you are at least a semi-experienced crocheter. I also wouldn't get too discouraged, it took me about three tries of making and then unraveling shells before I was able to actually have something worth wearing.
The pattern is also a slight modification, so as to make the first shell match the last shell, instead of the first shell looking awkward, which I think is an improvement, and everything else is that same as traditional Queen Anne's Lace.
Tuesday, November 22, 2011
New Appreciation: Doilies!
I've only made one doily before, and it was a Halloween one. I don't OWN any, so it's not like when I started crocheting my first thought was "Thank God, now I can make my own doilies!" Rather, doilies were the last thing on my mind.
I made this as a Christmas present, so I'm hoping the recipient won't see this post until after Christmas. Perhaps I could hold off on sharing this, but I just had so much fun, and I'm so proud of it, I just couldn't wait to share.

This is a rose doily, that came out so splendidly, I'm actually a little surprised I made it. It took a lot more yarn than I had anticipated, and even more time. Upon finishing the white doily portion, I was feeling pretty good about it, and promptly started on the roses. Little did I know it would take me more than one skein of Vanna's Choice yarn, and I was surprised how little dark green I had when I finished the leaves.

Each rose and leaf took me about 30 minutes, but I think it was totally worth it. I think the dark green and light pink came together very well, and it has a beautiful Celtic feeling to it. I'm almost sad I can't keep this for myself to place on a dark mahogany table.

I'm still not completely sure what a doily is...for. I know, I know. You can put your vases and your snack bowls on it, or whatever, but frankly, I don't have many nice things to place on top of a doily to make it look nice. There are some beautiful patterns out there, so I can't wait to explore them and make some more. My favorite part about doilies, is that, despite how intricate they look, they're actually very easy to make. I encourage everyone to try to make one, in fact, they're absolutely fantastic! Now, this one took a long time because of the flowers and leaves, but a plain doily will add some fantastic class and elegance in just a few hours.

The original pattern for this doily can be found here.
Wednesday, November 16, 2011
Crocodile Stitch! (How To)
I feel like so much is going on this week. I've written a novel, learned how to knit, learned SO MUCH about holistic medicines for asthma, and the most exciting one: I learned the crocodile stitch.
While I can't wait to post about all my other November adventures (...Noventures?), I'm going to have to hold off for now and teach you guys this fantastic crochet stitch. I can't seem to find the actually stitch for free anywhere, but I don't see why it shouldn't be available for free. I have done one project with it, and I'm so excited! It makes things look like DRAGON SCALES! Anyone who knows me know that crocheting and dragons are two of my favorite things, and I'm finally able to combine the two into one amazingly perfect...thing!

So far, all I've made with these are these crimson arm warmers that totally look like DRAGON SLAYING GAUNTLETS! I am astounded by them, and completely in love. While the stitch requires a bit of work, it's totally worth it in the end.
I've never done a crocheting tutorial, so please let me know if something should be further clarified or expanded upon.
I'm going to be doing a small swatch totaling 5 crocodile stitches to show you how it works.
The Crocodile stitch is very simple and consists of two simple stiches, the V stitch (V-st) and the Frost post Double Crochet (fpdc).
V stitch (V-st)- Work (dc, ch 1, dc) into a single indicated stitch.
Front Post Double Crochet (Fpdc)- Yo and insert hook from front to back around the post of the dc of the previous row, then complete as for a regular dc. This is kind of wonky to picture, so you can watch this youtube clip.
So, to start, I'm going to chain 17. (This will be a ch 13, plus a 4 ch to count as one dc and the ch 1 of the 1st V-st.)
1. Dc in 4th ch from the end, sk 2, v-st, which I'm then going to repeat until the last st, where I'm going to place my last v-st

2. Now you have 5 v sts. Turn your work, sl st in 1st ch-1 space, then do 5 fpdc from top to bottom of the 1st dc of the 2nd v-st from the beginning, ch 1 at end of 5th fpdc. I like to face my piece to the left when doing this, so the bottom of the V st faces the left.

3. Now do 5 more fpdc from bottom to top. When doing this, I like to point my V st towards the right. Push down the fpdc as often as you have to so that you can do them from bottom to top, while still having enough room.

Now you have one crocodile stitch!
4. Skip one V-st, and do 5 fpdc from top to bottom, ch 1, 5 fpdc from bottom to top..
Now you should have 2 crocodile sts.
5. sl st in ch 1 space of last v-st, sl st into last ch, then ch 4 (counts as 1st dc and ch 1), dc into same st. Now, make a V stitch in the spaces between the croc sts and on each side, so you'll have another 5 v sts
6. Ch 3 (counts as first dc), and 4 fpdc around 1st side of V st, ch 1, 5 fpdc. Skip v st, repeat (so the crocodile sts will now be on the 1st, 3rd and 5th V sts, instead of the 2nd and 4th, so that the 'scales' will alternate with each other).

Repeat the row of V sts and then the rows of fpdc to create a scaly pattern.
And obviously this is just a quick swatch to practice, but when you add more scales and more rows it builds up nicely to make a very dragon like piece of artwork.
While I can not provide you with the pattern for thedragon slaying gauntlets arm warmers, I can tell you that I got the pattern from Bonita Patterns. She has a lot of crocodile stitch patterns (and I hear she even has a book, too), which might be worth spending a couple bucks to see how the stitch works in an actual piece.
I look forward to seeing all of your dragon scalearmor textiles!
While I can't wait to post about all my other November adventures (...Noventures?), I'm going to have to hold off for now and teach you guys this fantastic crochet stitch. I can't seem to find the actually stitch for free anywhere, but I don't see why it shouldn't be available for free. I have done one project with it, and I'm so excited! It makes things look like DRAGON SCALES! Anyone who knows me know that crocheting and dragons are two of my favorite things, and I'm finally able to combine the two into one amazingly perfect...thing!

So far, all I've made with these are these crimson arm warmers that totally look like DRAGON SLAYING GAUNTLETS! I am astounded by them, and completely in love. While the stitch requires a bit of work, it's totally worth it in the end.
I've never done a crocheting tutorial, so please let me know if something should be further clarified or expanded upon.
I'm going to be doing a small swatch totaling 5 crocodile stitches to show you how it works.
The Crocodile stitch is very simple and consists of two simple stiches, the V stitch (V-st) and the Frost post Double Crochet (fpdc).
V stitch (V-st)- Work (dc, ch 1, dc) into a single indicated stitch.
Front Post Double Crochet (Fpdc)- Yo and insert hook from front to back around the post of the dc of the previous row, then complete as for a regular dc. This is kind of wonky to picture, so you can watch this youtube clip.
So, to start, I'm going to chain 17. (This will be a ch 13, plus a 4 ch to count as one dc and the ch 1 of the 1st V-st.)
1. Dc in 4th ch from the end, sk 2, v-st, which I'm then going to repeat until the last st, where I'm going to place my last v-st

2. Now you have 5 v sts. Turn your work, sl st in 1st ch-1 space, then do 5 fpdc from top to bottom of the 1st dc of the 2nd v-st from the beginning, ch 1 at end of 5th fpdc. I like to face my piece to the left when doing this, so the bottom of the V st faces the left.

3. Now do 5 more fpdc from bottom to top. When doing this, I like to point my V st towards the right. Push down the fpdc as often as you have to so that you can do them from bottom to top, while still having enough room.

Now you have one crocodile stitch!
4. Skip one V-st, and do 5 fpdc from top to bottom, ch 1, 5 fpdc from bottom to top..
 |
| Skip on V-st, doing your next 5 fpdc on the right dc of the 4th v-st from the beginning. |
5. sl st in ch 1 space of last v-st, sl st into last ch, then ch 4 (counts as 1st dc and ch 1), dc into same st. Now, make a V stitch in the spaces between the croc sts and on each side, so you'll have another 5 v sts
 | ||
| See how the bottom of the V sts are in the center and on either side of each croc st |

Repeat the row of V sts and then the rows of fpdc to create a scaly pattern.
And obviously this is just a quick swatch to practice, but when you add more scales and more rows it builds up nicely to make a very dragon like piece of artwork.
While I can not provide you with the pattern for the
I look forward to seeing all of your dragon scale
Tuesday, November 15, 2011
2011 NaNoWriMo Update #4: Day 15
50,012 / 50000 words. 100% done!
Stats:
Average Words per day: 3,334 (Down by about 300 words since the 9th)
Music: The Broken Bells Pandora Station. This is officially a record for the LEAST amount of time spent listening to Chrono Cross music while writing a novel.
Average Junk Food Consumption: Way below average (I'm trying a change in diet to hopefully help my chronic asthma)
I DEFINITELY expected to have had this finished on the 13th. I was at 45,000 words the night of the 12th, and I figured if not the 13th, then no way would I get past the 14th without 'winning'. But the 13th came and went, and I only wrote 295 words. It was very apparent that I needed a break, and just tried to roll with it, however difficult it may be to write about 7% of what I've been averaging. When midnight hit on the 14th, I only had 975 words to go, and what should have taken 45 minutes or so took roughly 2 hours.
It definitely got rough in the last few days. I've been spending a lot of time online, looking at absolutely nothing in particular, and just wasting time in general. My plot also took kind of a boring turn that I didn't really care for, and I condensed the plot a lot so as to hurry things up.
There is definitely st least another 7,000 words to this story, but I'd rather take my time getting those words out in the next 15 days, or frankly, whenever the hell I feel like :)
Oh! And in even COOLER news, since this is the second part to what I wrote in August, when I added this to the 1st document, the story is 338 pages, totaling 104,494 words! How CRAZY is that?! Like a real book :D
Wednesday, November 9, 2011
2011 NaNoWriMo Update #3: Day 9
32500 / 50000 words. 65% done!
Stats:
Average Words Per Day: 3,611 (Up since last time by about 300 Words/Day)
Music: TOTALLY addicted to the "Indie Chill" station on Slacker. I put in on one day when Pandora had a hiccup that was lasting too long and I CAN NOT TURN IT OFF. It is perfect for my writing.
Average Candy/Junk Food consumption: About the same as last time, not outrageous.
I was hoping to hit 35k by tonight, but a misunderstanding with the boyfriend prevented me from doing so, and I ended up stuck out of the house, sans netbook, for about 3 hours.
I am definitely starting to feel...tired. Being so disconnected from everyone and everything for just over a week is starting to take it's toll on me, mentally, but I just keep writing. I guess I feel like I have a lot to say. I just finished up my first weekend since NaNo started, and I'm actually rather disappointed that I didn't get more done. However, maybe doing something besides writing for a couple days was good. And, afterall, it's not like I didn't write ANYTHING, I got about 5,000 words written over my weekend, so it could have been worse.
I'm also feeling rather egotistical. I haven't found too many other people on the site with as many words as mine, so I'm seeming to have a hard time keeping my ego on it's leash. But, you know, sometimes I think I kind of deserve this. I don't really shine anywhere else, not the way I do when I do NaNoWriMo...so don't I deserve to be as egotistical as everyone else for 1/12th the amount of time that they are? Maybe I'm just looking for excuses. I don't know, this has definitely been one of the more emotionally tolling WriMos since the 1st one I did.
I hope everyone else is doing well, and keeping up with where they want to be.
Sunday, November 6, 2011
2011 NaNoWriMo Update #2: Day 6
20023 / 50000 words. 40% done!
Stats:
Average Words per Day: 3,337 (Up by about 600 words/day since last update)
Music: Chrono Cross, Final Fantasy, and my Pandora station stays on Florence + The Machine more than the Ratatat station.
Average Candy/Junk Food consumption: Probably a little higher than last time, although not outrageous.
Sound the victory horns, I am DOUBLING EVERYTHING. The par for the day today is 10k, and the words per day to finish on time is 1,666...where I have doubled both of those *Curtsies*.
Yesterday got kind of rough, my story took a very morbid turn, and my protagonist was being tortured and taken advantage of, pretty much for the whole day. I was at work, and when I walked away from my computer, I felt overwhelmed, and the weight on my chest was heavy and scary. I thought maybe it was work that was overwhelming me, but we were slow, and I realized it was the story I was writing. I had to turn off the computer and read something nice (Hello, Guild comics!) so that I didn't find myself clinically depressed.
I was so excited to get home, relax a little bit, and pick up the novel again, in hopes of taking advantage of Daylight Savings Time, but after cranking out an entire 200 words in about an hour, I shut the laptop and called it a night. I had worked 12 hours, woken up early, and was still trying to stay awake even later, while writing about torturing my MC. No, it wasn't meant to be.
I actually thought I may have been running out of steam, but after cranking out another 4,000 words, and getting my supporting characters in the story to save my MC from an eternity of torture, things are looking up (for my spirits, and for Faye).
At the rate things are going, I should be finished by November 14th, so let's see if I can keep up that word average for the next week or so ;)
Thursday, November 3, 2011
NaNoWriMo 2011 Update #1: Day 3
8334 / 50000 words. 17% done!
Stats:
Average Words per Day: 2,778
Music: Xena Soundtrack and Ratatat Pandora Station.
Average Candy/junk food consumption: Below average for a NaNo Event.
I am rather surprised at how well this is going. I have never written a 2nd part to anything I've ever written during a NaNo event, and the words seem to be flowing almost effortlessly. I have had some panic-induced moments of writer's block, but when I slowed down, and really tried to think about it, I picked a direction, went with it, and never looked back.
I am having some procrastination issues (mostly in the form of NaNoWriMo forums, and blog posts), but even still, I am still ahead, doing well, and enjoying my story (even more so than the 1st part!)
I have some beautiful scenes, some ugly scenes, German ninjas, and I made Christopher Columbus a vampire (mostly on a whim, but I love it!). I am also making the stroy less serious and more quirky than the 1st part, and am enjoying that decision SO MUCH! Hopefully when the two parts are put together it will work out, but the amount of revising I will have to do is overwhelming, so I'm going to try not to think about that.
I am two days ahead, and and can hopefully surpass even that. I am trying to get as far ahead as I can now, so when I become overwhelmed and tired, I won't fall behind.
It looks like I'm going to have my 4th NaNo Victory this year, and a complete 3rd novel! I am so excited!
Also, I'm thinking about looking into Scrivener, but I'm not sure how easy it is to use. Does anyone have any experience with this program?
Monday, October 31, 2011
NaNoWriMo Eve
So here it is, guys:

I have fingerless gloves to keep my hands warm while typing throughout the entirety of November, the Xena soundtrack, and about 1/5th of an outline written in a Rainbow Zebra notebook. I feel like running around and screaming, and also like I am SERIOUSLY GOING TO EXPLODE with creative ideas. Yeah, NaNoWriMo starts in about 2 1/2 hours and I AM FUCKING READY. BRING. IT. ON.
Other things in my arsenal of novel writing include:
- So much Halloween candy, and even more when it goes on sale tomorrow.
- A netbook! I can now write any time, anywhere.
- High apple pie in the sky hopes.
- Three years of success under my belt.
- An espresso machine, and a coffee pot.
- A four day weekend in the middle of November.
Seriously. Let's do this. I don't think I've ever felt more ready.
Sunday, October 30, 2011
Halloween Reflections, and Halloween Project #9: Pumpkin Seeds
Happy Halloween-Eve, everybody! Can
anyone else feel the magic in the air? I know I can. I went to the
grocery store today to pick up some things for a get-together I'm
having tonight, and there were little kids dressed as bumble bees,
Spiderman, unicorns...all kinds of fantastic and cute costumes, and I
was overwhelmed by the power of this holiday. My windows are open and
I have pumpkin seeds baking in the oven as we speak, and more than
ever I wish I had the ability to stop time and live in this day for
awhile.
I haven't always loved Halloween the
way I do now, I used to hate it, in fact. I was a pretty pudgy kid,
and I was certain that there wasn't a single costume in the world
that would fit me. I was awkward, and I always forgot about Halloween
until the last minute, and would be forced to come up with my own
costumes (which for about 4 years straight was a shirt and skirt with
the same pair of Fairy Wings), and one year I wore a devil mask and
one of my Dad's suits...I was the Devil going to work, of course.
Pretty clever, but no one would leave me alone about it. “Why are
you wearing mens clothes?” They would ask.
What I should have said is “Because
it's Halloween, and I can be anything I want to be. There are no
rules here, and I want to be the mother fuckin' Devil, going to do
his mother fuckin' job, and my mask is fuckin' AWESOME!” But I
didn't. I stammered and stuttered and made up excuses about how
Halloween was dumb, trying to cover up the fact that I was really
just awkward, and I didn't have any imagination when it came to
costumes (the costume was my Dad's idea, after all, I just thought it
was quirky).
And then there were those 3 or 4 awful
years where I was too old to trick or treat, too young to have a
party. So I either tried to trick or treat in my makeshift costumes,
old women sneering at my 'lack of effort' and turning me away from
their free candy. Bah! Why even bother. I focused on the magic of
Halloween, the beauty of Autumn, the colors, the spirits and the
supernatural. I read ghost stories and learned about what the Wiccans
and Pagans do for Halloween, I tried talking to spirits, I visited
graveyards. It wasn't what I wanted out of Halloween (because I never
met a spirit who gave me free candy), but if it weren't for that, who
knows how I would feel about Halloween nowadays.
Then, about two years after I moved
out, something hit me. Myself and my roommate decided to host a
Halloween party, both dressed as pirates, and it was fantastic. I got
drunk, I ate lots of candy, and at one point I was trying to steer my
house from my porch. It. Was. Perfect. Halloween started running in
my veins, and I immediately couldn't wait for next year. The next
year, I spent about $150 on a fairy costume, and felt like a million
bucks. Halfway through the night at the party I was hosting, myself
and my at-the-time-friend Gabe went outside and confessed our
feelings for each other. Tomorrow is our two year anniversary.
There is much more to Halloween for me,
I could certainly write for hours about it. But it's something that I
grew into, something that found it's way to my heart in every single
aspect that a holiday can. For me, it's beautiful, spiritual,
romantic...and of course, there's candy. I don't think there's
another day of the year that makes me feel exactly the way Halloween
does.
As a simple, delicious recipe, here's
what I've decided to use to cook my pumpkin seeds this year. I wish I
could give you my tried-and-true traditional Halloween baked good,
but as I said, halloween isn't tried-and-true, it is always evolving
for me.

What You'll Need:
- 1 1/2 tablespoons margarine, melted
- 1/2 teaspoon salt
- 1/8 teaspoon garlic salt
- 2 teaspoons Worcestershire sauce
- 2 cups raw whole pumpkin seeds
How To Do It:
- Preheat oven to 275 degrees F.
- Combine the margarine, salt, garlic salt, Worcestershire sauce and pumpkin seeds. Mix thoroughly and place evenly only a baking sheet
- Bake for 1 hour, or until crunchy, stirring occasionally.


Hope you all have a fantastic
Halloween!
Thursday, October 27, 2011
Halloween Project #8: Ghost and Skull Cake Pops
I am learning a TON about white chocolate this week. Here are the two most important things:
- If you overheat your chocolate, it will scorch and become absolutely useless.
- Melting/melted chocolate can't get wet! If this happens, it will have the same reaction as overheated chocolate: it will get very stiff and absolutely useless. Bonus annoyance: This means you can't add food coloring to your white chocolate! Perhaps they make a dry food dye, but that's certainly not what I have, and it's something I learned the hard way.

So today, I have some plain white ghost and skull cake pops for you. They're rather easy, and super tasty.
What you'll need:
-Cake, of course! I used a box cake, because I'm lazy. And this isn't teribly important, as this will be crumbs in no time.
- Black Decorating gel
-White Chocolate
-Flavored Creamer of your choice (I used White Chocolate Macadamia Nut)
- Lollipop sticks
-Foam block, or a makeshifted ghetto rigged contraption to keep your pops upright after they've been dipped in chocolate (Mine was foam board and a couple books taped together...)

1. Bake your cake according to package/recipe directions. After it has cooled completely, break it apart into chunks and put them in a large mixing bowl. Using a fork, break apart the chunks until your cake has been turned into crumbs.
2. Add your creamer. I think I end up using somewhere between 1/4 - 1/2 cup, but what I really look for it that it's moist, and that the cake crumbs stick to each other.
3. Shape your cake crumbs into triangles and ovals. Make sure your triangles are thick enough so they won't break once you put them on the lollipop stick. Cover a baking sheet in aluminum foil and place the triangles and ovals onto foil. Freeze for 20 minutes, or refrigerate for an hour.
4. Melt a little white chocolate, and stick the lollipop sticks in the white chocolate, and then insert into the cake pops about 1/3rd of the way through, if not halfway. Refrigerate for about 15 - 25 minutes.
5. Melt the rest of your white chocolate, and dip the cake pops into the white chocolate, placing them in your foam block, or makeshifted ghetto rigged contraption. Refrigerate or freeze one last time to be sure the chocolate has hardened.
6. Give the triangles ghost faces, and the skulls skull faces! Om nom away.

I was really hoping to make some pumpkins, but my heart was broken when I added the food coloring to my chocolate and it completely seized. I like these guys, though. They came out very nicely, and I'm very pleased :)
Gabe is almost finished with his assignment, which is what these are for. He still has some loose ends for some of these projects to tie up, and as they are tied up, more projects will be provided! I have some days off work soon, so hopefully I will be able to manage to do these, and be ready for NaNo come November 1st. I am so nervous! There's no way I'm ready....but I still look forward to writing that victory post!
Tuesday, October 25, 2011
Halloween Project #7: Ghost and Gravestone Cupcakes

I'm buckling down, really. But Gabe's homework requires Halloween crafts, and he asked for my help, and I can't just let him down, now can I? This week has been crazy, though. What started out as "Maybe I could get some photographs of things you've already made", turned into "You should bake a bunch of great things!". It's not that I didn't want to, but there was certainly quite a bit of work required for everything I did. Other projects will be posted this week when they're all put together properly.
Anyway! Our project for today is actually rather simple, and I didn't do anything homemade, but you can make your own frosting and cake if you should desire. With just a few ingredients you can have a haunted graveyard!

What you'll need:
- Cake! I used a chocolate box mix, but what you choose to use is not important to this project.
- Nutter Butter Sandwich cookies
- White Chocolate (24 oz should do the trick), divided into 2.
- Black food coloring (I used Icing Coloring for this one)
- Green food coloring
- Black Decorating Gel
- Hot cocoa powder (Optional)
- 16 oz. Can of white frosting, divided into 2.

1. Bake your cupcakes in white cupcake liners according to box/recipe instructions.
2. While your cupcakes are baking, melt half the white chocolate (be sure not to overheat it, or your chocolate will seize and will be ruined. Melt for 1 minute in microwave, then in 15 second increments until it is smooth. If a few chips remain unmelted, just stir until it is smooth). Cover a baking sheet in aluminum foil. Dip Nutter Butter cookies into white chocolate, and place on aluminum foil. Refrigerate or freeze.
3. Melt other half of white chocolate the same way, slowly add in your food coloring until your chocolate is gray. Once again, dip the Nutter Butters in on both sides, and laying down on a baking sheet covered in aluminum foil. Refrigerate or freeze.
4. With your frosting divided in two separate bowls, dye one half green, and the other half black. To get a good BRIGHT green color, I added some yellow drops until it was less bluish green and more like grass.
5. After your ghosts and gravestones have hardened, remove from the fridge/freezer. Write "RIP" on the gravestones, and give the ghosts faces with the black decorating gel.
6. Frost your cupcakes, half in green, and the other half in black. Sprinkle hot cocoa powder over the green ones to be 'dirt'. If you'd like, you could make all of the frosting green, so as to make a 'haunted graveyard', but there are plans for haunted house cupcake liners in the near future so the ghost will have a place to haunt. It is entirely up to you, of course, as making cupcake liners will be a lot more work.
When you frost the grass, be sure to make the frosting very 'rough' so as to mimic grass, and keep the black very smooth so as to mimic a floor.
7. Using a spoon, dig a small sort of 'ditch' in the center of your cupcakes (this will prevent the cupcakes from cracking in half), then place the graves and ghosts in their appropriate cupcakes.
8. Indulge!
I didn't realize how fantastic this was going to be until I got to eat one of the gravestones that broke in half. Apparently Peanut butter + White chocolate is ACTUALLY PRETTY GOOD. I was very pleased, and the fact that there is a moist chocolate cupcake to go along with it makes things even better.
Coming up this week I have stencils, my first cake -pops- and a haunted house to put that ghost inside. While I am rather tired, I can't wait to see how everything turns out!
Sunday, October 23, 2011
Buckling Down
I can't believe it's already October 23rd. There is pretty much no significance to this day, except for the fact that NaNoWriMo is ONE WEEK AWAY. I am writing a 2nd part to a novel I don't remember anything about, and I'm not even quite sure where I'm going with it.
So I'm buckling down.
I have to stop crocheting, and I have to stop everything else, because the next 5 weeks of my life are going to be incredibly busy and full of novel novel noveling.
I am lucky that I have a netbook now, so I'll be able to get some writing done at work...but I'm still going to have to kick my craft addiction for the next five weeks, and so I apologize for the hiatus, but it's November, which means a novel has to be written.
I'll be focusing on that for the next 5 weeks, so, sorry if it gets a little boring around here. I promise I will return in December, although wary, full of inspiration for winter and Christmas projects.
Friday, October 21, 2011
Cabin Fever Crochet
The days are getting shorter, the weather is getting cooler...you just have to love fall. But soon, there will be snow days, there will be days so cold it won't be sane to even think about leaving your house, but the serenity of the snow and the beauty of winter will certainly overwhelm you.
Well, at least that's my experience.
Here are three wintry projects to help you get through the season without going insane, and hopefully being able to focus on the beauty and comfort of winter, as opposed to the chapped lips, snow shovels and icy roads.
1. Snowflake Dishcloth

This was a fun little project that would make a great gift, or a nice decoration (although it's a 'dishcloth' I think it would work better as a doily). I was kind of overwhelmed at the sight of it, but it actually ended up being rather fun, easy, and quick. There were some things about the pattern I had issues with, so I improvised a bit, but it still ended up looking very lovely.
2. Openwork Cowl

This is another somewhat quick project, and I really enjoyed it. This is a pretty small cowl in comparison to other cowls, but that was kind of its charm for me. You can have a nice, fuzzy thing around your neck with only 1/5th the amount of work as a regular sized scarf. I used bulky, soft yarn to make it extra cozy.
3. Snow Day Fingerless Gloves

For this pattern I used Vanna's Choice (I used an entire skein of it, I only had about 2 feet of yarn left when I was done! Miraculous.), and Lion Brand Fun Fur for the bottom edge. These are super chunky, fuzzy, warm, and to be honest; a little addicting. After I made these I thought about putting them up for sale on Etsy, but I absolutely can not take them off (I am wearing them right now, of course). And I think they will be perfect typing gloves for when the house gets a little drafty in winter. I adore these things, and highly recommend making a pair for yourself.
Row 1: Ch 37, sc in 2nd ch from hook, dc in next ch, *(sc in next ch, dc in next ch), repeat from * across, turn.
Row 2: Ch 2, (does not count as 1st st), hdc in each st across, turn.
Row 3: Ch 1, sc in 1st ch from hook, dc in next ch, *(sc in next ch, dc in next ch), repeat from * across, turn.
Rows 4 - 26: Repeat rows 2 - 3, 11 times, then repeat row 2 once more.
Fasten off leaving a long tail.
Fold Glove in half with WS facing outward, sew together the first 22 sts of row 1 and 26 for seam. Fasten off. Starting from other end, sew together the 1st 3 sts of row 1 and 26 for seam. Fasten off, leaving 11 sts not seamed for thumbhole.
Thumbhole
Rnd 1: With glove still inside out, attach yarn with a sl st to st closest to seam, ch 1, hdc in each st around thumbhole, join with sl st to 1st hdc.
Rnd 2: Ch 1, hdc in front loop only of each st around, join with a sl st to front loop of 1st hdc.
Rnd 3: Ch 1, hdcdec in front loop only of 1st 2 sts, repeat with each pair of sts around, join with a sl st to back loop of 1st hdc
Edging
Invert glove to be right side out, and attach fun fur yarn in any stitch at the bottom of the glove with a sl st. sc in each each st around. Working in continuous rounds, make 5 rows of scs. Fasten off.
I hope you guys enjoy these projects, and hopefully they will make the winter a little more bearable, not to mention cozier and warmer.
Saturday, October 8, 2011
Halloween Project # 6: Viking Hat and Beard

Well guys, here you go. As promised, one full-on amazingly badass Viking get-up. As I write this, my eyes are drooping and my whole body feels numb with exhaustion. I'm finished with day 7 of a 9 day work week, and I can honestly say that this project got me through most of it. It kept my spirits pretty high, my hands busy and my mind occupied on other things besides...well, work.
This whole project took about 6 days, and I'd say overall it cost me about $25 to do (although worth every penny when Gabe put it on and the thing actually fit). I'm sure one could also do it for cheaper, but I used Caron Simply Soft, which runs about $4.50/skein. You could easily use Red Heart for $2.90/Skein, I just wanted it to be as nice as I could make it (I tend not to skimp on yarn when it's a gift).
Unfortunately, $6.50 of that expense was purchasing the pattern, so unfortunately I can not provide it for you here, it would not be fair to anyone, especially the creator of the hat.
If you would like the pattern of the hat, it can be purchased through Etsy here.
If you would like the pattern for the beard, you can get that for free on Ravelry here. However, as I stated in my last entry, throughout the beard I used long rows of fringe to make the beard more realistic, then added 'sideburns' so they could properly connect to the hat.
If you're looking for something to get you through a long week, or something to keep you warm and silly through the winter, I definitely recommend both the hat, as well as the beard. Both of these pieces were equally fun to make, and I had a ton of fun getting a laugh out of my co-workers by explaining to them that I spent my day crocheting a beard :)
Here are some more detail shots:
 | ||
| I added a button to the inside of the hat, and a loop at the end of the 'sideburns' so the beard can be attached or detached whenever you want. |
 |
| Hat, sans beard. |
 | ||
| I'd never used 'fun fur' yarn before, and although it looked quite sparse and difficult to use at first, it ended up being rather easy and fuzzy. |
 |
Hopefully next project will be something great, but I'm not sure what yet! I hope you guys got a little bit of inspiration from these pictures, and I can't wait to take more 'action shots' of this as Halloween approaches :)
Monday, October 3, 2011
Viking Beard
 |
| Gabe being a fantastic model |
While this beard may seem as though it's in the spirit of Halloween, it really isn't. My lovely boyfriend had his birthday last week (it was the 1st anniversary of his 29th birthday!), and while a sushi dinner was probably sufficient, I still felt as though his 30th should be bigger and better. For my 22nd birthday, he spent 50+ hours making me a digital painting of Mermaid Fairy Princesses, so I thought I should make him something, too.
The idea came about on the night of his birthday when we were looking through Ravelry patterns together, and it all came to me in a beautiful clear picture when a friend of mine posted a picture of a 2' long crocheted Viking beard to a crocheted Viking hat on my Facebook wall. So we decided that was what was going to be made.
I used the beard from this pattern as a kind of 'face cozy", then proceeded to take groups of 4 strands of yarn and pulled them through like fringe on a scarf throughout the beard. I used about 160 groups of this 'fringe' to make different layers of 'hair' on the beard. I used a little over a 315 yard skein of Caron Simply Soft to make this, but I think it was completely worth it.
The Viking Hat will be next, probably done in a few days or so :)
Tuesday, September 27, 2011
Halloween Project #5: Severed Monster Finger Chapstick Cozy
Well, Chapstick, you lose. I've been saying for years that you guys should make a keychain holder so I (and everybody else in the world) don't have to buy chapstick every 4 days (or maybe that's exactly what you want us to do...).
Well, now it's too late. Not only do I have a keychain holder to keep my chapstick in so I'll never lose it, BUT IT'S IN THE SHAPE OF A SEVERED FINGER. BEAT THAT.

This took almost no time, and even less materials. You can find the pattern here. I omitted the button clasp, as it's very snug, and there's no way that chapstick is coming out on it's own, and I used black for the fingernail and knuckle instead of brown...other than that, the pattern is easy to read, very accurate and really fun.
Enjoy!
Halloween Project #4: Jack O' Lantern Mug Cozy
This pattern should have been really easy to come up with, and I was flabbergasted when the traditional Jack O' Lantern mouth didn't turn out perfectly on the first try. I made about 4 - 5 attempts to crochet a mouth that looked somewhat decent for a Jack O' Lantern before I decided to just simplify it. I simply used a zig-zag pattern. So even though this guy doesn't look exactly like a Jack O' Lantern (and kind of looks like he's wearing a comically over sized mustache), I still think he's pretty cute...and will give me extra comfort when I drink Pumpkin spice tea.


What you'll need:
- Medium worsted weight yarn (I used Red Heart..."Carrot", to be exact.)
- Size H Hook
How to do it:
Base is worked in continuous rounds.
Using your orange yarn:
R1: Ch 2, 6 sc in 2nd ch from hook (6 sc)
R2: 2 sc in each sc around (12 sc)
R3: *2sc in next st, sc* 6 times around (18 sc)
R4: *2 sc in next st, 2 sc* 6 times around (24 sc)
R5: *2sc in next st, 3 sc* 6 times around (30 sc)
R6: *2sc in next st, 4 sc* 6 times around (36 sc)
R7: *2sc in next st, 5 sc* 6 times around (42 sc)
R8: 1 sc in each sc (42 sc)
Sides are worked in rows back and forth.
R9: ch 1. In back loop only, hdc in each st around ss to first hdc, ch 1, turn. (42 hdc)
R10 - 11: Working in both loops, hdc in each st around. ss to first hdc, ch 1, turn. (42 hdc)
R12: hdcdec over next 2 sts, 38 hdc, hdcdec over last 2 sts, ch 1, turn. Do not join to first stitch of this row. (40 hdc)
R13: hdcdec over next 2 sts, 36 hdc, hdcdec over last 2 sts, ch 1, turn. (38 hdc)
R14 - 23: hdc in each st around. Finish off at the end of R23. (38 hdc)
Making the ties:
Join orange with ss at the end of R22, ch 30, sc in second ch from hook and next 3 sts, hdc to end of ch, ss to end of R21, finish off and tie in ends (4 sc, 25 hdc)
Repeat tie on opposite end of mug
Making the eyes (Make 2):
Using black yarn:
- Ch 5, sc from 2nd ch to end of ch (4 sc)
- 1 sc, 1 scdec, 1 sc (3 sc)
- 1 scdec, 1 sc (2 sc)
- 1 sc (1 sc)
- Finish off, leaving a long tail to tie onto cozy.
Making the mouth:
- ch 29. 2 sc in 2nd ch from hook. (1 sc in each of next 3 ch. Miss next ch. 1 sc in next ch. Miss next ch. 1 sc in each of next 3 ch. 3 sc in next ch) twice. Miss next ch. 1 sc in next ch. Miss next ch. 1 sc in each of next 3 ch. 2 sc in last ch. Finish off.
When sewing on the eyes, if your triangles are a little wobbly, use the yarn you're using to tie it on to even out the edges a bit.
And the final step: drink some coffee (or more appropriately: Pumpkin spice tea).
The next project will be...well...a mystery. Not because I'm a master of suspense, but rather, because even I don't know. I guess we'll see when we get there!
Monday, September 26, 2011
Halloween Project #3: Boo Ghosts

These guys were definitely a bittersweet project. Much like the Candy Corn in my previous entry, I assumed they would take very little time (considering how tiny they are), but as it turns out, it's actually a pretty real project.

The entirety of this project is actually 15 seperate pieces that are sewn together at the end, and it made for a somewhat tedious task. I always get kind of annoyed when starting a piece, so starting 15 pieces became...irritating, and made things more time consuming than they would have been otherwise. Not to mention, all the tight stitches cramped up my right hand a few times, and I definitely got some new callouses from this project. However, I didn't spend every free minute of my time for the past 2 days doing these guys because I hated the project. Although tedious, it was really fun, and came together very smoothly. Making the letters, the poses and the faces were by far the best part. If you're looking for a fun Halloween project to dedicate yourself to for a little while, this is definitely it....also, admittedly, it probably wouldn't have been as tedious if I had given myself some time off from the project

The funniest part about this project was actually an incident at work. As I've mentioned before, my job allows me to crochet or read between busy times, and I was working on this particular project yesterday. We were somewhat busy, and I had just set this project to the side as I worked. I had been working on the letter "O" when a customer asked me what I was making.

Not sure exactly how to explain the entirety of this project to her in less than two seconds I simply said, "Ghosts."
"But ghosts aren't orange."
"Yeah...well...they're going to be holding up the letters B-O-O, to spell 'Boo'"
"Pfft. everyone knows ghosts don't have arms!"
Err...what? I wasn't sure what kind of ghosts this woman had been seeing, but apparently my tiny crochet project did not meet her expectations, or replicate the things that had apparently been haunting her. I still kind of chuckle about it, but that wasn't the first (nor will it be the last) time that someone has said something....silly regarding my crochet projects.
The pattern for this project can be found here, assuming you're all okay with making ghosts that have arms (even though everyone knows ghosts don't have arms).
Halloween Project Number 4 will be a pattern of my own, and I'm hoping it works out. It looks like I'll be getting all the crochet projects out of the way first, then onto other things.
Friday, September 23, 2011
Halloween Project #2: Amigurumi Candy Corn
So as you may, or may not, remember, back in June, I decided to do 31 Halloween-related projects before Halloween. I did one, and there was nothing for a long while (not because I didn't want to...you know how it is when your car breaks and you get 25 commissions to help pay for it, and then you move and simultaneously decide to write a novel. Or maybe you don't...but that's what happened, either way).
Well things are calming down a bit, and so I can finally move forward. It's finally Autumn, and so I think we're all in the mood for Halloween, anyway.

These little candy corn are, for lack of a better word, FREAKING ADORABLE. They are about 3" high, and take about 30 minutes to make (so you can make a million of them!). I can't wait to make a bunch to put in candy dishes, or possibly put on string to make a festive candy corn garland. Either way, this is a quick project, and you can get 2 - 3 finished in an hour.
You can find the pattern on the Lion Brand website here.
The next pattern involves ghosts! It's another crochet one, and I'm excited for it.
Wednesday, September 21, 2011
Scarf with Pockets

What a brilliant idea, right? Right. I wish I could even take credit for the idea, but a friend of mine commissioned me, and I couldn't say no. It's basically a scarf, but about 2 feet longer than you'd like, then sew up the pockets. If you're interested, here's the pattern for this exact scarf, but this scarf can pretty much be done with any set of colors or patterns, just sew up some pockets at the end.
 |
| This scarf is long enough to be the appropriate length for pocket usage after it's been wrapped around your neck once. Snuggly! :3 |
Color A - The short section of color (Purple in this scarf)
Color B - The long section of color (Black in this scarf)
Ch 32 w/ color A, dc in the 3rd crochet from the end, dc to end of scarf (30 dc)
[[Dc 9 more rows of color A (10 rows)
Change color to color B, dc 30 rows of color B. (40 rows)]]
Tie in loose ends.
Fold Color A over so that is goes over 25 rows of color B, leaving 5 rows of color B still exposed. Using a tapestry needle, sew both sides together using color B yarn. Fold inside out so the seams aren't able to be seen. I did this first instead of doing both pockets last, so I would have an idea of how long it was going to be. I didn't want to finish the scarf thinking it would be long enough, only to sew the pockets over to find it was too short.
Repeat directions between the [[double brackets]] 5 more times.
dc 10 rows of color A. Finish off.
Tie in all loose ends
Now sew up another pocket. Since you're going to be flipping this pocket inside-out, be sure to fold it over to the opposite side of where your first pocket is, then when you fold it inside-out, both pockets will be on the same side.

Now you will have a scarf to keep your neck and hands warm during the winter! Enjoy.
Subscribe to:
Posts (Atom)